Installing Home-Assistant.io on a Synology Diskstation NAS

Home Assistant is a free, open source program for Home Automation. In this guide, I’m going to show you how to install it using Docker on a Synology NAS, with full compatibility with z-wave and network discovery.

There’s a few things you should be familiar with before we get into the nitty-gritty of this.

SSH

You should be familiar with logging into and using SSH. We’ll be using SSH to connect to our Diskstation to run commands on the Linux command line. You’ll see why this is important shortly.


Docker

There’s a whole bunch of information about Docker and how it all works. What containers and images are, all that jazz. I suggest you read up on it to get your head around Docker. It will be worth it, as Docker is [in my opinion] one of the most powerful packages available on Synology products.

In a nutshell, we’ll be using Docker to create a virtual machine (called a container). This container will be running an operating system, that will in-turn run Home Assistant.


Setting Up Your Diskstation

Before we dive straight in, there’s three things you’ll need to have set on your Diskstation first.

Enable User Homes

User Homes

Enabling User Homes in DSM 5

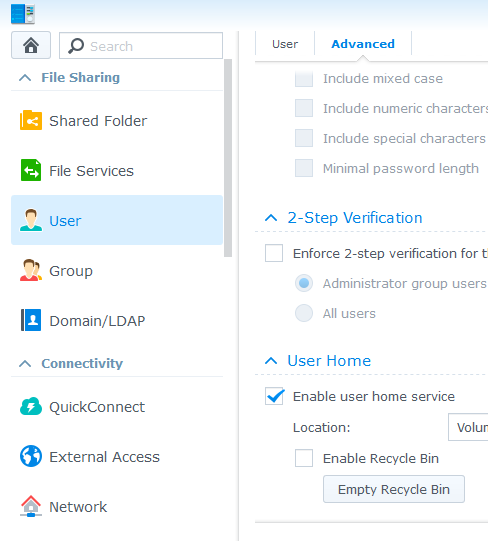
By default, your Synology allows basic access to the filesystem. Every user that logs into the Diskstation can access the same files as everyone else. “Homes” is a feature which allows each user to have their own home directory. We’ll need to enable this option, as it will enable us to access more areas of the Synology from the file manager.

  1. Login to your Synology NAS from a browser, using the admin account.
  2. Under Control Panel -> User -> Advanced. At the bottom, be sure to enable the option Enable User Home Service.


Enable SSH Access

We’ll be logging into the NAS using SSH, so we can perform some Linux commands.

  1. Go to Control Panel -> Terminal & SNMP
  2. Be sure the Enable SSH Service is checked.


Install the Docker Package

The Docker package is officially available from Synology, so you should be able to easily find it in the Package Center on your Diskstation.

Once you’ve installed the Docker package, start it. If you’re having issues getting the Docker package to start, check your network settings. I’ve found the Docker will not start if you have an OpenVPN network connection enabled. Disabling the OpenVPN network connection, and then starting Docker should work. Once you have Docker running, you can re-connect the OpenVPN connection to encrypt your traffic again.


The Latest In Your Inbox

Enter your email address below to receive my latest blog posts and videos about Home Automation in your Inbox


Logging In via SSH

Now that we have everything setup, it’s time to login to our Diskstation via SSH. I prefer to use a free tool like Putty to do this. Type in the IP Address of your NAS, and the port number specified when you enabled SSH above (default is 22). You’ll then be asked for a username.

DSM 5

I’m running DSM version 5. The latest released version (at the time I’m writing this) is 6. On my version, I need to enter the username root. Using my admin username will not work for what we want to do. So, enter your username as root and the password to your admin account.

DSM 6

If you’re running a newer version of DSM, you may not be able to login using the root username as described above. Instead, you should login using your admin username and password.

Once logged in, use the following command to switch to the root user using the command su - root

Update January 21 2017

User @patflest on the Home Assistant forums has tested these commands with DSM 6, and found that by prefixing the commands with sudo they will work on DSM 6. I’ve updated the commands below to include versions highlighting DSM 6.


Obligatory Caution

You’re now logged into your NAS using the super user account. You are basically in God mode. Although I haven’t heard of it happening, you could potentially brick your NAS if you do something wrong.

Always ensure you check twice before executing any dangerous commands.

Home Assistant Dockerfile

Home Assistant has an official Dockerfile. This is also available from the DockerHub. This will make our lives much easier.

The Dockerfile from Home Assistant will automatically install the Z-wave libraries for us. However depending on whether we want to use Z-wave or not, we’ll need to change the command we need to run to get Home Assistant setup.


Installing Home Assistant without Z-wave

If you don’t want to run Home Assistant and use a USB Z-wave radio, then we don’t need to add any USB devices to our container. From your SSH window, run the following command

Let’s break this command down a bit.

docker run tells Docker to run a container with the parameters we’re parsing.

--name home-assistant The name flag will allow us to easily identify which container is running Home Assistant. This is useful if you use the Docker control panel from the Synology DSM, or when we need to do some commands against the container (like starting, stopping etc)

--restart=always This is a powerful and handy flag to set, especially for Home Assistant. This will tell Docker to keep trying to re-start Home Assistant if it crashes. So, if you’re editing a new automation and make a YAML syntax error (which you will do), you won’t need to open up SSH again to get Home Assistant started once you fix the problem. This is one of the flags you can’t set when using the Docker DSM UI.

--net=host Another important and powerful flag. We need to make sure Home Assistant has full access to our local network. We’ll need this for network discovery to work. This will allow Sonos, Hue, Plex etc to be discovered on the network automatically. This is one of the flags you can’t set when using the Docker DSM UI.

-itd This is actually three commands in the one. The important one is d. This tells Docker to run in detached mode. Once Docker runs the container, our SSH session is returned to us. If we don’t specify this, we’ll see the output from Home Assistant in our SSH console. Also import is the t, which tells Docker to tag the container for future use.

-v /volume1/Shared/docker/homeassistant/config:/config Here we’re creating a folder on our NAS to keep the Home Assistant configuration files. You can place it in any folder you like. I’ve chosen here to place it in a folder called Shared, which I can access from my local network easily. Whatever you choose to use, the folder must exist before you will be able to start Home Assistant. If you want to use the same folder as I did above, you can create it by running mkdir -p /volume1/Shared/docker/homeassistant/config

homeassistant/home-assistant Finally this tells Docker which container to lookup on DockerHub.

Once we run this command, Docker will begin to start downloading all the files Home Assistant needs, such as the operating system, Python, and Z-wave.

Once everything has been installed (it could take some time the first go around), you should be able to access Home Assistant at the IP address of your NAS. For example, my NAS is at 192.168.1.3, so I can access Home Assistant by going to http://192.168.1.3:8123. The last part of the address tells the browser to connect to port 8123, which Home Assistant listens to.


Installing Home Assistant with Z-wave

Installing Home Assistant with support for Z-wave on your Synology NAS is basically the same as above, however there are a couple of other flags we need to add to our command.

Before we begin, we first need to plug in our Z-wave USB radio into the NAS. I’m using an Aeotec Z-stick.

Once your Z-wave radio is plugged in, we need to find out the path to the radio. When you plug any USB device into your NAS (or any Linux system), it is given a filepath that you can use to access it. On Synology, our USB path is stored in the /dev/ folder, so let’s try and find our USB stick in there. Using a SSH window, we can run the following

The above command should show you any USB devices plugged into your NAS. If you have more than one, you may get multiple items returned. For myself, I have the following USB devices plugged in.

As this is the only device I have plugged into my NAS, I can safely assume that this is my USB radio. If you have more than one device returned, I suggest you unplug your radio, re-run the ls command above, and see which number is missing. This will be your z-wave USB Radio.

If the ls command above didn’t return any USB devices for you, its possible your system is assigning them another name.

Now that we have our USB radio filepath, we can setup our Docker container. Let’s slightly change our docker run command from above, to include some more parameters.

--privileged Gives the container some higher access rights. Usually this isn’t necessary, however I’ve included it because I trust Home Assistant, and want to ensure it has access to the USB on the host without any permission issues. Remember, as we’ve only included the config directory in the -v flag, the Home Assistant container won’t be able to access anything outside of that directory on the NAS. So there’s not much harm that it can do outside of that folder.

--device The magic flag that will link the USB Radio into the Home Assistant machine/container. When the Home Assistant machine/container boots up, it will have a USB device available at /dev/ttyUSB0.

Now that we’ve got our new Docker command setup, we also need to enable Z-wave on Home Assistant. Let’s edit our configuration file and add the following.

That will tell Home Assistant where to look for our Z-wave radio.


Adding a Bluetooth Radio

I also have a USB Bluetooth Radio plugged into my Diskstation. However, it doesn’t come up using the command above. Instead, if you’d like to use the Bluetooth device tracker, you can use the following flag to give Home Assistant access to that device.

So, if you want to enable Z-wave and Bluetooth in Home Assistant, your new Docker run command looks like

Of course, we’d also need to enable the Bluetooth tracker in Home Assistant, so we’d add the following to our Home Assistant configuration.


Upgrading Home Assistant

One of the great things about Home Assistant is their rapid development time. There’s usually a new release of Home Assistant out every 2 weeks. Which is very impressive.

When it comes time to upgrade your version of Home Assistant, we need to login via SSH again. This time we’ll want to do the following.

  1. docker stop home-assistantStop Home Assistant from running.
  2. docker rename home-assistant home-assistant-oldWe’ll rename our current Home Assistant container to something memorable. This way, if there’s an issue with the new version of Home Assistant it’s easy to roll-back.
  3. docker pull homeassistant/home-assistantTell Docker to fetch the latest version of Home Assistant.
  4. docker run --name home-assistant --restart=always --net=host -itd -v /volume1/Shared/docker/homeassistant/config:/config homeassistant/home-assistantRe-run the command we used to build Home Assistant in the first place. (Command above is if we didn’t use Z-wave)


Some things to watch out for

I’ve been using Home Assistant on my Synology for a few months now. Here’s a few things I’ve noticed that may help you.

Disable any OpenVPN Connections when starting Docker
The Docker Package on Synology DSM can’t be started if you have an OpenVPN connection open. When trying to start Docker, your Diskstation will hang, and then fail to start the Docker package. Disabling the OpenVPN connection, then starting Docker should fix this. Once Docker is running, you can turn your OpenVPN connection back on.

Must use the root user
To perform the docker commands in this blog post, you must use the root user from SSH. Using any other account (even the admin account) just won’t work. Unless of course you’re using DSM 6, which you can use the admin account if you prefix all docker commands with sudo.

Home Assistant with Z-wave Radio won’t start after NAS Reboot
This is a frustrating issue I’m yet to solve. When your Synology Diskstation reboots for any reason (you shut it down, there was a power failure), the Home Assistant Docker won’t be able to boot because the USB attached to the NAS has stopped responding.

To fix this, I usually have to do the following steps

  1. Remove the USB Radio from the NAS USB port. Then plug it back in.
  2. If Home Assistant still won’t start, I open up an SSH connection as root, and perform the following command
    rm -rf /dev/ttyUSB0 WARNING: That is a very dangerous command to perform. I have had no issues doing this with my Aeotec Z-stick, but please be careful!
  3. Remove the USB Radio from the NAS, and plug it back in

After performing those steps, my Home Assistant container will boot up again. A UPS for the NAS might be a good investment in the future.

Where to Next

Now that you’ve got Home Assistant up-and-running, its time to start setting up your automated house. Be sure to checkout the Home Assistant Website and of course forums! The Home Assistant community is friendly, and always happy to help!

Buy me a hot chocolateBuy me a hot chocolate


Recommended Posts
  • PushPeekPop

    Excellent write up and I’m really appreciative that you shared it. Still, I have some questions:

    1) How up to date are these instructions regarding the latest releases?
    2) Do you perform backups of your installations and, if so, how?
    3) Ever figure out the Z-wave reboot issue? That sounds pretty irritating.

    Regardless, I’ll certainly be referencing this as I do an install on my DS214play.

    • Hey PushPeekPop!

      1) As mentioned in the post, this is for DSM 5. The only difference I am aware of is how you access root as explained above. All other commands are then just simple docker commands, which haven’t changed since I posted this. So anything starting with docker should be accurate, no matter what version of DSM you’re using.

      2) I currently have my Synology NAS set to RAID over the harddrives. Once a week, a complete system backup is taken, but also stored on the NAS. For HASS configuration, I have copies on my computer, which I use as my “master” then copy over to the NAS. I haven’t currently got a proper offsite automated backup in place. Something to look into I guess!

      3) Nope, still no clue on that one. However since posting this I’ve rebooted my NAS a couple of times, and interestingly not faced the same issue. So I’m hoping Synology have fixed it in one of the security updates I’ve installed, or I’ve just been lucky.

      Cheers

  • On DSM 6 (or greater), su - root does not work. I had to use sudo -i after logging as admin. Also, it will be nice to note that the user needs to ensure that the path /volume1/Shared/docker/homeassistant/config exists before running the command (I had to manually create the directory).

    • Good point about the path needing to exist! I’ve added a note for that 🙂

  • Scott Bradshaw

    If you are using secure Z-wave devices (ex: Locks), you will need to add a Network Key to options.xml file, and map this. As of 0.39, the mount path is /usr/local/lib/python3.5/site-packages/libopenzwave-0.3.2-py3.5-linux-x86_64.egg/config/options.xml

    • Hey Scott,

      Interesting. I used to use a network key for my setup, as I was having issues with powered devices being marked as dead (there’s a thread on the Home Assistant forums about it).

      When I used that, from memory I just placed by options.xml file in the same folder where my Home Assistant configuration.yaml file was placed. Hopefully it’s still the same in the latest versions.

      • Scott Bradshaw

        Hmm. This is not what the HA zwave documentation says. The file goes in the openzwave config_path – not the HA config path. I also believe I originally tried this, and it didn’t work. When I upgraded to 0.39, the libopenzwave path changed, and my network key didn’t get mapped. When this happened, the lock stopped working. The worst part was even after correcting the config.xml path in Docker, the lock STILL didn’t work. It seems like whenever an invalid key is tried, the lock will refuse to work again with the controller for security reasons? Not sure. I had to remove node and add secure node again. For the lock, it was a pain, because it requires you open the lock and pull out the zwave component and put it 12 inches away from the controller. Such a pain!

        • Ugh no that sucks! However, I guess as its a lock it’s probably a good thing that it requires you to re-link, incase of a security breach.

          Thanks for the heads up and info where to put the options.xml file!

  • Jaysen Polanco

    Phil,

    Thanks for the tutorial, very easy to follow… however I am having one slight problem… I am running DSM6 and using sudo commands… when attempting to run with Z-wave, I’ve followed your steps – replacing ttyUSB0 to ttyACM0 – and once it downloads and extracts, I get the following error;

    “docker: Error response from daemon: stat /volume1/shared/docker/homeassistant/config: no such file or directory.”

    In my shared folder, I do have a Docker subdirectory with a homeassistant folder. Any ideas?

    EDIT: Disregard.. I read a few post down that the folder had to be manually created in DSM6. All is well now!

  • André van Stijn

    Good morning Phil,

    Thank you for this clear tutorial, did you make any progress on “Home Assistant with Z-wave Radio won’t start after NAS Reboot”?

    Thanks in advance,

    André

    • Hey André,

      Since posting this, I haven’t seen the z-wave radio issues on reboot as I described. I’m not sure if Synology have pushed an update out, or if it was just Murphy’s Law by me posting the article.

      So far, I’ve rebooted my NAS a couple of times and both times Home Assistant and my z-wave network have come back up perfectly.

      Considering how rare it is for my NAS to reboot, I haven’t delved into it deeper, and just hope it keeps working.

      Cheers

      • André van Stijn

        Hey Phil,

        Thank for your quick reply, my syno worked until I rebooted twice and now it is dead again.

        Can’t find a sollution, did you try it using a different port?

        Kind regards,

        André

        • Yeah, I found I needed to perform the rm commands in the article, before unplugging the radio and plugging it back in. Interestingly, no matter which port I used, it always came up to the same /dev/tty address. However, changing ports is worth a try!

  • How would one also add in Homebridge support for doing Homekit?

    • Hey Jason

      I haven’t used this for some time, but here’s a Docker image I used for HomeBridge. Here’s my run command

      You can then connect to HomeBridge on port 51826 to set it up.

      Hope that helps

  • André van Stijn

    Hey Phil,

    I would like to add a picture behind the peoples device name for tracking them, nog I don’t get it done with this setup.

    I installed Home Assistant in the following way:

    sudo docker run –name home-assistant –restart=always –net=host –privileged -itd -v /volume1/Shared/docker/homeassistant/config:/config –device /dev/ttyUSB0 homeassistant/home-assistant

    So the installation directory is “/volume1/Shared/docker/homeassistant/”

    So I created the www map as follows “/volume1/Shared/docker/homeassistant/www” and put the jpg inside it the I used the pictur: /local/picture_name.jpg line in the known_devices.yaml, but this is not working, what am I doing wrong? I tried a png and a jpg file neighter one of them are showing up.

    Thanks for responding,

    André

    • Hey André,

      Someone else had the same question yesterday on YouTube 🙂

      You’ve done everything right. I believe you’ll need to restart home assistant before it will detect the www folder

      If the restart command doesn’t work, you may need to use

      After Home Assistant comes back online, you should be able to use /local/file_name.jpg to access the files in the www folder.

      • André van Stijn

        Hey Phil,
        I tried many times but it apears that the /local/picture.jpg dissapears???

        Thnx,

        André

  • Hilman Chung

    Hi Phil,

    Hope you can help me out with this. I followed your instruction here to get HA install on my Synology Nas. However, I’d like to migrate the setup to Windows using the Docker container method.

    I followed the HA installation instruction using –net=host and also tried Bridge mode but neither way could get the “Discovery” component working. I had to use a manual configuration yaml to get all of my devices populate.

    Beside this “Discovery” issue, everything else is working properly under either –net=host or bridge mode… Would you have any idea on how to get this going on Windows?

    • Hey Hilman!

      Hmm I am not sure on this one. I think there’s a lot of Docker + Windows issues that could potentially cause this.

      According to the Discovery Component Docs there are a couple of known issues on Windows. The one that sticks out to me is

      If you are on Windows and you’re using Python 3.5, download the Netifaces dependency

      Home Assistant recently upgraded the Docker images to Python 3.6. So I am not sure if this applies. However, I would suggest trying to install that Netifaces dependency inside the container. You can open a bash console to the container

      Then follow the instructions to install that Python dependency using pip.

      I don’t know if this will help, but at least its something for you to try. Best of luck!

      • Hilman Chung

        Thanks but no luck…

        On the other hand, would you know how run docker and home-assistant off a usb drive on the Nas? My ultimate goal is really just to let the HDDs hibernate more often.

        • Damn.

          Hmm I haven’t tried this, but I can’t see why it wouldn’t work. When you insert a USB drive, I think it creates a folder for you at /usbshare1

          So, you could then replace those in the docker run command

          It may not be /usbshare1, so take a look around the file system to see what the file path might be. If not I’m sure Google will be able to find the path. Then its just a matter of adjusting the run command above to the path where your USB files are.

          Let me know how you go. Would be interested to hear if running it from a USB does indeed allow your harddrives to hibernate.

          Cheers

          • Hilman Chung

            Thanks Phil,

            I tried getting USB running…. Couple of issues – 1. It seems the USB path is not persistent after stopping and starting HA, after a restart of the container, HA cannot find the Config path…. 2. I think this still won’t allow for hibernation to happen because the container itself is still running on Volume1.

  • Pingback: Setting up a local Mosquitto server using Docker for MQTT Communication – Phil Hawthorne()

  • grenzpfosten

    Hey Phil.

    First thanks for the great howto. I experience a strange behavior though with zwave. After about 24 hours zwave becomes unavailable. If i restart hass it wont come up and if i then restart the docker Container, all is good again for 24h. Maybe i need to restart docker from synology every 24h?
    Thanks for your helps.

    Florian

    • Hey Florian,

      Unfortunately I’ve also experienced this on my Synology. Only recently though. Not sure what would cause it. Everything z-wave related just stops working. I would have to unplug my z-stick and back in again to get it to work.

      I originally thought it was faulty, so I did a hard reset of the z-stick. However the problem came back straight away. I then tried upgrading the firmware of the z-stick. Still didn’t help.

      I am not sure what is the cause here. When the z-wave network goes down, I would lose all of my motion sensors which would stop lights from turning on or off. Not ideal.

      I ended up buying a second-hand vera lite on eBay, and use that as a network hub to communicate with the z-wave network. Response times are pretty good, if not the same as the z-stick. The vera has support for a lot more devices than openzwave, which is a bonus.

      So, I’ve got a couple of options for you.

      1) Create a script which will try to detect when z-wave is down. In my automations, whenever I call turn_on or turn_off on a z-wave device, I also have a script. That script has a delay of about 20 seconds. It then checks to ensure the device did get turned on/off. So, if I turn on a desk lamp in an automation, if 20 seconds later the desk lamp is off, then Home Assistant assumed z-wave is doiwn. You could use this to trigger a Home Assistant restart, or send you a notification. If you’d like this script let me know and I’ll share it.

      2) I have a few docker containers that need to restart for various reasons. From your DSM control panel, there’s a scheduled tasks option. You can create a scheduled task to restart the Home Assistant container every day at 3am if you wish.

      Hope that helps!

      • grenzpfosten

        Hi Phil,

        thanks for your promt reply and good to see that I’m not alone (means I’m not totally dumb 🙂 )
        I think Option 2 is where I will go, cause when I restart Hass out of a trigger, It will not come up (err_connection_refused) until I restart the docker container.
        Would be great if you could explain, how exactly to restart the HASS docker container out of the DSM control panel. Do you use a script (if yes, please share) or shut down the docker service entirely?

        Thanks!

        Florian

        • Yeah I have trouble restarting from inside HASS as well.

          So, to setup a scheduled task in Synology go to Control Panel -> Task Scheduler -> Create -> User Defined Script

          Once in there, you can enter in any command you would normally execute via SSH. So, I just put the command as

          https://uploads.disquscdn.com/images/70ab5f4cca789f41528703831b396f7dfffa643db9c226e0d6ff4c55c4c3e09f.png

          Then just setup when you would like the restart to take place in the schedule tab. Be sure to set the user as root if that’s an option.

  • Chris McElroy

    Hey Phil, quick question. I’m trying to set up ssl encryption but I’m running into a wall. Did you set it up?

    • Hey Chris,

      No I haven’t setup SSL just yet. Where are you having trouble?

      I started looking into it. What I was able to do was install the Certbot docker container onto my Synology, and generate the keys into a file. I would then have to copy them into the Home Assistant config directory.

      Eventually I’d have wanted to create a scheduled task for DSM to run the Certbot docker, and place the certificates into Home Assistant and reboot HASS. But didn’t get that far at all.

  • André van Stijn

    Hey Phil,

    I have a question to you, I run also for a while now HASS on the Syno 1515+ and I like it very much. What I need is to install the configurator so I can modify the yaml file in hass like https://home-assistant.io/docs/ecosystem/hass-configurator/. Are you running this configurator? I can’t get it working, I think it has something to do with the path:

    panel_iframe:
    configurator:
    title: Configurator
    icon: mdi:wrench
    url: http://I_think_here_is_the_problem:3218

    Thnx in advance,

    André

    • Ah interesting. I am not using this configurator unfortunately.

      So this configurator needs its own HTTP server setup in order to run. You would need to spin up another docker container in order for it work. Just plugging in the files to the home assistant config directory isn’t enough in this case.

      However it looks like someone has created a Docker container which will run this configurator. You can check out the Home Assistant forum thread and see if it works for you: https://community.home-assistant.io/t/simplistic-configuration-ui/10175/147

      • André van Stijn

        Hey Phil,

        I searched for days for someone with a sollution, this might be the one thnx for this reference. I will try tonight and will inform you.

        Kind regards,

        André

  • AbDhops

    Hi Phil,
    Your guidelines are really helpful. Just tried them on DS
    716+II with DSM 6.1.4. I am using SigmaC FTDI (FTDI FT232R USB UART
    A70252DY) as my z Wave stick. After following your instructions, I was
    not able to see the ttyUSB device under my /dev/. After debugging I
    found non loaded drivers for this particular device as rootcause..
    To resolve this I loaded usbserial and ftdi drivers using below commands. Both were already present under /lib/modules.
    sudo insmod /lib/modules/usbserial.ko
    sudo insmod /lib/modules/ftdi_sio.ko

    After loading the drivers I was able to see ttyUSB0 device. I could also see below kernal message (using dmesg).
    [ 74.543561] usbcore: registered new interface driver usbserial
    [ 74.598596] usbcore: registered new interface driver ftdi_sio
    [ 74.605103] usbserial: USB Serial support registered for FTDI USB Serial Device
    [ 74.613394] ftdi_sio 1-2:1.0: FTDI USB Serial Device converter detected
    [ 74.620877] usb 1-2: Detected FT232RL
    [ 74.624992] usb 1-2: Number of endpoints 2
    [ 74.629569] usb 1-2: Endpoint 1 MaxPacketSize 64
    [ 74.634737] usb 1-2: Endpoint 2 MaxPacketSize 64
    [ 74.639906] usb 1-2: Setting MaxPacketSize 64
    [ 74.649489] usb 1-2: FTDI USB Serial Device converter now attached to ttyUSB0
    Once the device got detected, it works like charm as you have already explained.
    Nevertheless,
    as above drivers are not loaded by default, I had to write a startup
    script (@ /usr/local/etc/rc.d/startup.sh) which includes above commands.
    This also resolves the issue of non starting Z wave at startup at my
    end.

    — Abhijit

    • Hey Abhijit,

      Thanks for sharing this! Great to hear you were able to make a startup script and get everything working.

  • Tim Samuelsson

    Hi,

    I have created a udev rule for my aeotec zstick:
    echo ‘SUBSYSTEM==”tty”, ATTRS{idVendor}==”0658″, ATTRS{idProduct}==”0200″, SYMLINK+=”zwaveusbstick”‘ > /lib/udev/rules.d/99-usb-serial.rules

    Can i give the container access to /dev/zwaveusbstick ?

    Thanks in advance!

    By the way, you should ad the udev rule mapping to your tutorial to make it easier for newer users 🙂

    • Hey Tim,

      I personally thought the udev mapping was a bit overkill. They shouldn’t change too much on a NAS,as the system should be on almost permanently. But good for others to use if it works on Synology (wasn’t sure it would).

      Yeah you can give it access to /dev/zwaveusbstick. Just be sure to use that in your Home Assistant config file when telling Home Assistant where your USB path is.

      • Tim Samuelsson

        Ok, thanks.

        Is it possible to use the DSM docker GUI to do this or doI need to use the terminal?

        • I don’t think so. To link devices using the –device flag, you’ll need to use the terminal I’m afraid. This at least is true for DSM5

          • Ziptbm

            should all docker instances set up through this guide show up in the Docker GUI within Synology DSM? For some reason it’s only showing me the last 2 containers, so when an update is performed (following this guide), it only shows the old two versions and not the latest one. Has anyone else seen this and/or knows how to get them to show correctly in the Docker GUI?

          • They should do, yes.

            Are you looking at the images, or containers? It should show all containers, but maybe it removes the old versions of images by default or something.

            Can you see them if you do a docker ps -a in a terminal?

          • Ziptbm

            That’s what I thought. Containers. So in terminal, it shows 3 containers, but in the Synology Docker GUI, it shows only 2.

            Before I stumbled upon your guide (which is awesome, btw), I set up the first container via the GUI. I then set up my “second” container following this guide and renamed the old one (originally created via GUI) to “home-assistant-old.” 2 days later, there’s another update, so I renamed the one made two days ago to “home-assistant-old2.” Now my GUI only shows “home-assistant-old2” and “home-assistant-old”, but it does not show the latest one I just setup today with the latest build. In terminal, it shows all 3 and the latest one is actively running, but the containers list in the GUI has no record of active containers, but the CPU/RAM indicators show activity and I can reach Home Assistant via a browser (both of the old containers are off).

            I’m considering starting completely fresh by deleting all instances (and docker) and starting over. Any suggestions?

          • I wonder if it is a feature of DSM to not show it. If you’ve used a flag like –net=host or something (which isn’t supported by the UI) then DSM may hide it from the UI so you don’t break the container.

            I’ve just checked my DSM (which is DSM5) to see what containers mine displays.but it won’t load for me (might be because I’m accessing it remotely).

          • Ziptbm

            So I just uninstalled Docker, deleted my containers, and reinstalled to start fresh. The first container that I set up usinfg the CLI worked as expected and showed up in the Docker GUI. After going through the update process, it appears the “new” container is what’s not showing up. The old one shows up and appears renamed per the CLI.

            I wonder if it has something to do with renaming it the same thing as the previous container?

            I’m super new to docker and linux, so figuring this out as I go. If I were to just skip the rename and pull the latest bits to update, would that work for the update process? I’m thinking I can do a manual backup of my config separately to avoid the container missing from my GUI.

          • Hmm interesting.

            Each docker container has two identifying parts. The container name (like home-assistant) which you define, and an ID which the system generates. I am wondering if the Synology is looking for container name home-assistant with abc123, but when you update it via the CLI the ID changes, so home-assistant is now xyz987 and it has no idea what to do about it. Might not be the issue, but that’s all I can think of now.

            So, unfortunately you’ll need to do a rename or destroy the old container. When you create a container, you create it against a version of an image. So, let’s say Home Assistant 0.60. When Home Assistant 0.61 comes out, you can’t just do docker pull to update your container. You’ll need to create a new container to run on 0.61.

            So now I’m wondering, do you need these containers visibile from the UI? I haven’t used it myself, but have recently heard about Portainer. It is a management UI you can run from within Docker to manage other docker containers. Think of it as the GUI you can see from DSM, but much more powerful.

            That might be a good option for you, if you don’t want to muff around with DSM’s GUI glitches.

            Also, be sure to check out my Dockermon container if you want to start/stop containers from within Home Assistant.

          • Ziptbm

            The ID change makes sense, thanks.

            You’re totally right about not needing the containers visible in the UI, but for someone new to Docker/Linux/etc (e.g. me), it’s helpful to have this ability. Will be looking into Portainer and Dockermon.

            I did manage to upgrade Home Assistant all through the DSM Docker GUI (after initial setup following your guide above). Here’s what I did, so please let me know if you or anyone else here believes this process would/could cause any issues down the road:

            1. Download Latest Home Assistant Image – DSM > Docker > Registry > search for home assistant & download latest image
            2. Stop Current Container – Container > select container > Action > Stop
            3. Copy Current Container – Container > select container > Settings > Duplicate Settings > Rename (e.g. …-old) & Apply
            4. Clear Current Container – Container > select container > Action > Clear
            5. Restart Current Container – Container > select container > Action > Start

            After doing this, Home Assistant appears to have updated successfully, maintained my config, and kept my USB z-wave device attached. And I can Stop this container and Start the old one without issue, all from the DSM Docker GUI. Any potential issues using this method over command prompt for updates?

          • Oh excellent! I didn’t think the z-wave USB would come over with that, but glad to hear it does indeed work.

            I can’t see any problems, except maybe the network not coming across. But sounds like that should work too

  • Henrik Wiberg

    Thank you for your guide, it works perfect!
    Only problem i have is with pushbullet. Do i have to “install” the service in some way?

  • Jokerigno

    Hi Phil,

    First of all thank you for your posts.

    Reading this one in particular helped me to move my HA from a Pi 3 to my xpenology (a Dell T20 running Synology Is).

    Now, in my spare time, I want to set also docker-hub, graphana and so on.

    Just one question.

    Your config files are in home assistant’ cookbook?

    I’m very curious to see different components you described in your posts.

    Thanks
    J

    • Hi Jokerigno,

      I’m glad these were able to help you!

      My Home Assistant config isn’t hosted on GitHub yet. Like everyone’s, my config changes so often that it is a mess and unorganized. For the moment, I find it more useful for others to write these posts and break down how each part of the config works. If there’s a particular component that you’re interested in which I haven’t covered off in a post, please let me know so I can make a note to do a post on it!

      Cheers

  • André van Stijn

    Hey Phil,

    I use your command to pull the newest Hassio and install it in the docker app successfully all the time. Thank you for that, now there is a bug into the latest Hassio and I would like to pull an older version, can you tell me what I can do to install a previous version? It is pulling the latest version all the time.

    Thnx in advance,

    André

    • Hey André,

      So I assume you mean Home Assistant, and not HASS.IO?

      If so you can specify the tag at the end, so instead of

      You can use

      .

      Just replace 0.61.0 with the version you want.

      Cheers

      • André van Stijn

        You are right I meant Home assistant, I did it and it works, highly appreciated.

        Thnx

    • Bjørn Andersen

      Hi Phil, truly appreciate your effort in providing these instructions! However, when running the install command for Home Assistant on my Aeotec stick, I get this error message:

      Unable to find image ‘homeassistant/home-assistant:latest’ locally

      latest: Pulling from homeassistant/home-assistant

      05d1a5232b46: Pull complete

      5cee356eda6b: Pull complete

      89d3385f0fd3: Pull complete

      80ae6b477848: Pull complete

      28bdf9e584cc: Pull complete

      dec1a1f0462b: Pull complete

      a4670d125615: Pull complete

      547b45a875f5: Pull complete

      102a0247b454: Pull complete

      46c7dd012f19: Pull complete

      3e25502553d3: Pull complete

      a62b9a85ac3f: Pull complete

      b7086045dd94: Pull complete

      9cd41f15004b: Pull complete

      924fa7215d83: Pull complete

      Digest: sha256:b9ae5ee6beeeff8b3dc7948a44f35c4bedb2ee3a1366af907fb926842efc629b

      Status: Downloaded newer image for homeassistant/home-assistant:latest

      2b5d21093cfd9a35ab92892aa46a33627daede2db083d77ae306cf76b3ac1c69

      docker: Error response from daemon: Bind mount failed: ‘/volume1/Shared/docker/homeassistant/config’ does not exists.

      Would I have to create that folder manually first?

  • André van Stijn

    For everyone who is interested in running a Home-assistant in docker with SSL this solution worked for me at a DS 1515+. Point the location where your certificate files are stored in your Synology directly in your configuration.yaml

    ———————————————————————————————————————————————————————————————
    Run this in Putty:

    sudo docker run –name home-assistant –restart=always –net=host –privileged -itd -v /volume1/Shared/docker/homeassistant/config:/config -v /usr/syno/etc/certificate:/certificate –device /dev/ttyACM0 homeassistant/home-assistant

    #and update your configurations.yaml:

    ssl_certificate: /certificate/_archive/fyjQFl/cert.pem
    ssl_key: /certificate/_archive/fyjQFl/privkey.pem

    • Nice!

      What are you using to generate the SSL certificates? Certbot or something from the Synology NAS directly?

      • André van Stijn

        Let’s Encrypt, it’s integrated now in dsm 6.x

    • Pete

      @andrvanstijn:disqus I’d love to use your method too and I’ve just renewed my LetsEncrypt certificate on my RS814+. I’ve logged in with both Putty and WinSCP but I can’t access the folder /certificate/_archive to see what the folders are inside. How’d you navigate to _archive?

    • Pete

      Thanks Andre. So these paths are no longer valid?

      ssl_certificate: /certificate/_archive/fyjQFl/cert.pem
      ssl_key: /certificate/_archive/fyjQFl/privkey.pem

      Does that alter the command line for launching the Docker container at all if the new locations are:
      /certificate/system/default (which I can access)?

      • André van Stijn

        Hello Pete,

        Sorry for the late reply, I am on a business trip in China with a very poor internet connectioc. I discovered that those path are valid temporarily, the path in the default directory is the right path where the certificates are stored every time.

        Kind regards,

        André

  • Scott Bradshaw

    For a quick start with Home Assistant on Docker in Synology, download my DSM Docker settings file for 0.63.2 here: https://drive.google.com/open?id=1a-Xm3b6yCgKw0JP_Une8Fo20hzGST2AK This already has the localtime mapped, the Timezone set, the USB device mapped, etc.

    You can easily edit the file to update your HASS config path/USB/Timezone. Then it’s a simple Settings->Import on Container screen. No command prompt to worry about with all those flags. If you want to upgrade HA, just change the version in the JSON file, and re-import to create a new container.

    • Nice work Scott!

      Which version of DSM does that apply to?

      • Scott Bradshaw

        Should work in 5.2, 6.0, and 6.1. I have not tested in 5.2 though.

  • Klaus Væthe

    Hi Phil!

    Great tutorial, but I am having problems downloading the home assistant docker image.
    RUnning the ” docker run -d –name=hass –restart=always –net=host -v /volume1/docker/
    hass:/config homeassistant/home-assistant” command, i get:

    FATA[0030] Tag latest not found in repository homeassistant/home-assistant

    I have also tried downloading the image in the gui, and that also fails. I have disabled firewall, switched to google dns servers (as someone recommended) and changed my mtu to 1500.. nothing is helping.. Also tried specifying :latest or :0.65.1 and that did not help either.. I just can’t seem to get the image downloaded..

    any ideas?

    • Hmm both of those tags exist on Dockerhub, so that should be fine.

      Have you got the Synology firewall enabled, which might be blocking Docker from communicating outside of your network?

      • Klaus Væthe

        I have tried disabling the firewall, and also tried making a any allow rule.. none worked..

        • Strange. Are you able to run other images with the docker run command? Or is it just home assistant that fails?

          • Klaus Væthe

            I now tried pulling lroguet/rpi-home-assistant and that one did pull… So.. must be something strange with the homeassistant/home-assistant docker repository?

          • Strange that others won’t let you download it.

            Wonder if there’s a cache issue? Can you try

            Then try pulling it down again?

          • Klaus Væthe

            Hi Tried the command, and this is what I got:

            docker rmi homeassistant/home-assistant:latest
            Error response from daemon: No such image: homeassistant/home-assistant:latest
            FATA[0000] Error: failed to remove one or more images

          • Damn, so I guess it’s not a cache issue then. You officially have me stumped

          • Klaus Væthe

            I must say, I find it strange that a piece of software like Home Assistant is so troublesome.. I tried running it on a regular debian install, and that was a pain as well… Basically, if you don’t want to run it on a rPi, you’re in for a ride..

          • Klaus Væthe

            I guess I can run the rpi version inside docker.. but is that any better or worse?

  • Christian

    Hi Phil,
    brilliant blog – nice tutorials and inspiration – thanks for sharing!
    Using your guide, I was able to set up Home Assistant on my Synology 918+ without a lot of trouble – really cool.

    A question on your hardware:
    How do you add more controllers given the limited number of USB-ports in the NAS – just a USB-hub and that’s it?
    I’ve added a z-wave controller by plugging it in one of the (two) USB-ports on the NAS, will add a bluetooth dongle as well – and consider maybe an Ikea Trådfri Gateway – but will be out of ports for that…

    • Thanks Christian!

      Hmm, so I haven’t got that many things plugged into my Synology. My Synology has a fair few USB ports though.

      I moved away from a z-wave USB to a Vera hub.

      I can’t see why a USB hub wouldn’t work though, Might be a good solution.

      Does the Trådfri Gateway require a USB port?

      • Christian

        Stupid me – the Trådfri Gateway is connected via ordinary ethernet cable to the router – so that won’t be a problem…
        So, I have enough ports and will wait and see if I ever need more and then just try 🙂

  • Strex

    I realize this is a bit of an old thread, but figured it would be the best place to ask.. Thanks for the write-up Phil, it helped me a lot! I’m using the /dev/bus/usb:/dev/bus/usb vol above. I’ve connected a (known-working) BT device to the Syno, and fired up the container.
    I’m getting the following in the logs:
    Can’t open HCI socket.: Address family not supported by protocol

    I get the same error message, if I run “hciconfig” from inside the container.
    Suggestions?

    • Hmm,

      Are you running your container with the privileged flag set? That might be a solution.

      • Strex

        Thanks for fast response!
        I actually managed to fix this myself. I was running with the privileged flag, but in bridge mode initially. Which just caused more problems with HA components. Switching it to host, fixed the problem.

  • Lee Berry

    got HA up and running within docker , it has found a number of devices on the network … all good

    but how do i edit the yaml files ??? i have looked every where !

    is there a simple answer/guide ?

    Lee

    • Hey Lee,

      Check the docker run command you used, and take a look at the -v flags. For example

      That means my YAML is in /volume1/docker/hass/config. So check what’s before the :/config

      Cheers

      • Lee Berry

        i have /volume1/docker but no hass for homeassistant folder just a folder called @eaDir

        might start again !
        TA
        Lee

  • Oronzo

    Great job!
    I succeded to install HA in my DS216+II. Sorry for my little knowledge of linux command, but I have a little problem.
    I’ve installed docker and HA in the same directory you have suggested : volume1/Shared/docker/homeassistant/config
    I can access to this path by ssh. I cannot access this path by Synology File Station. This is a big issue because I don’t know how to edit configuration.yaml as no text editor is available in Synology ssh.
    Can you help me please in order to gain access to volume1/Shared/docker/homeassistant/config in a UI way?

    Thanks for your help.

    • Cheers!

      Could be a ownership permissions issue. First, lets try make the owner of those files and folders the admin user and group

      If that doesn’t work, you might be able to replace the IDs with this command instead:

      After that, the files should be owned by the admin user, and the users group should have access to the files. This should allow the UI to see the files.

      If that doesn’t work, you could try the very dangerous command

      That will give the files access to all users on the NAS.

      If that still doesn’t work, then I would check did you create the Shared directory from the Synology UI? If not, you might need to add that as a shared folder from the UI first.

      Hope that helps

      • Oronzo

        Above all thanks for your prompt replay.

        I’ve tried your suggestions, but without success. I did not create the Shared directory from the Synology UI, and now I cannot do it, I guess because the ” volume1/Shared ” already exist, in fact I get an error trying to create this shared folder from UI control panel.
        Sorry if I bother you, but another suggestion of yours is really appreciated

        • Damn I was afraid of that.

          My next suggestion is going to be a difficult one. I would first close down all of your docker containers with docker stop.

          Then, rename the Shared the folder to something else using

          Once you have done that, re-create the Shared folder in the Synology UI. It should work now that you’ve renamed the folder.

          After that, we’ll want to put all the files from inside the shared folder back into the original location, so we’ll use

          That should bring all the files back. Then try running your docker containers again with docker start.

          If that doesn’t work, just check that you have enabled User Homes in your Synology config, as described in the article. Enabling user homes should give you access to some other folders on your NAS (like the ones you create with SSH).

          Cheers

          • Oronzo

            Fantastic! Your last suggestion works great.
            Now, I need to learn something more on Home Assistant and its potential, in order to automate my home… let’s see…

            Thanks againg

  • Talon

    @philhawthorne:disqus do you think a udev rule on the host could help with the loss of Z-Wave USB after rebooting? I’ve looked into it a bit, and it seems like it may allow for mapping, but I haven’t figured out the syntax to even try it as a solution to that issue.

    • @disqus_1nryP1XkYA:disqus I don’t think so.

      In my experience, when the z-wave issue would occur, I had no trouble still accessing the Z-wave USB by its path. It hadn’t changed at all. For whatever reason it was just unusable. It might work but not sure on the syntax to use on Synology.

      • Talon

        Oh, that makes sense! Mapping is probably not the issue. I just verified on mine and you’re right as the mapping isn’t missing…Maybe it’s the drivers?

        My workaround has been to just stop the docker container, run Domoticz app on Synology for a few moments, turn off Domoticz, and then restart the docker container.

        • Now that’s interesting. So if you run Domoticz, it will fix the Z-wave issues without needing to pull the USB out?

          • Talon

            Yes. Just have to do the run/stop on Domoticz with HA container off. Works every time I try it.

          • Wow that’s a good tip to know!

          • Talon

            Any creative ideas on how to automate this? 🙂 e.g. some sort of HA automation sequence that starts the other service and stops it? If it’s a driver issue, then it seems like there’s got to be a way for HA to do this without Domoticz. I’m just super new to HA (and Linux and Docker for that matter), so not sure how to help further than sharing this workaround.

          • Hmm

            I am not sure what Domoticz does differently to Home Assistant, that makes the USB work. As far as I know, Domoticz and Home Assistant both use OpenZwave.

            I’m wondering if you could use HA-Dockermon for this. Its just a REST API allowing you to start stop and restart containers.

            You could have a Home Assistant automation, which starts the Domoticz container. After x minutes, it turns off the container, then restarts the Home Assistant container.

  • Bjørn Andersen

    Trying to follow the instructions here, but I get stuck at creating the folder before installing Home Assistant. I get this error message, and I have checked the Shared Folder permissions, which seem OK. Any idea why this won’t work?

    admin@SynologyDS713:~$ mkdir -p /volume1/Shared/docker/homeassistant/config

    mkdir: cannot create directory ‘/volume1/Shared’: Permission denied

    • That’s an interesting error, not sure why you would get that.

      Looks like you’re using the admin user (and not root), so assuming you’re on DSM 6. You may need to prefix the command with sudo, so

      should do the trick

      • Bjørn Andersen

        Did I mention I am a newbie at this….? This worked, thanks!

        However, in the meantime, I have sadly ascertained that the Fibaro Roller Shutter 2, which triggered the need for installing Home Assistant, will not work where I intended. Any other compelling reasons for proceeding with Home Assistant and Z-Wave when everything else is handled through HomeKit?

        • Hmm well how are your Z-wave devices connected to HomeKit?

          From my (limited) knowledge of HomeKit, there are no smarts behind HomeKit. So sure, you can control your devices through Siri, but where Home Assistant becomes really powerful is in the automations. So, HomeKIt allows voice control of your devices, but Home Assistant is the brains behind your smart home that does the heavy lifting.

          • Bjørn Andersen

            Hi, I don’t really have any pure Z/Wave devices, I have either deliberately chosen HomeKit-compatible devices or devices that I can integrate into HomeKit through HomeBridge. And while it might have been true in the beginning that Home and Siri did not allow much more than turning single devices on or off, that has certainly changed. I can create rather complex automations in the Home app, and even more complicated ones in the Elgato Eve app, that integrates with Home. And with the new Shortcuts app launched as part of iOS 12, additional opportunities are opening up. So in the cases where I can get supported devices, I am pretty good. My trip into Z-Wave was triggered by a project to control a sun screen, for which no HomeKit solutions exist.

  • Patrik

    Hi.

    I tried installing HomeAssistant in Docker on a Synology DS218+ DSM6, but the web server doesn’t start. (I’ve tried both through GUI and CLI)
    – There are no errors in home-assistant.log.
    – I have uncommented “http” in configuration.yaml
    – I have run a port scan that says that confirms that 8123 is open.

    Any pointers? Anything would be helpful 🙂

    • Interesting.

      Couple of things I would try

      1. Make sure you’re using “sudo” in your command.
      2. Make sure you’ve added the –privileged flag to your docker run command
      3. Remove the -d from the docker run command, and watch the output of Home Assistant. This may give you some clues s to whats going on.

      • Patrik

        Very interesting indeed. I of course used your command, with sudo, but modified volume path and USB device (for zwave) to match my world. I also tried with and without “-p 8123:8123”.
        Although now on the 13’th try or so, it worked. I removed “-d”, and started trying, so I noticed it got my requests on port 8123 and just tried again. Suddenly it worked. Same run command as before. Thanks 🙂

  • Robby Campano

    Hey Phil, I’ve been working on getting the homeassistant/home-assistant image running on my Synology. I just got my aeotec z-stick and have been trying to get it recognized within HomeAssistant and haven’t had any luck. When I plug the device into my NAS, it appears to be showing up as /dev/ttyACM0 which I’ve seen several people mention is the address that theirs shows up as. I’ve tried starting a docker image with the commands that you mention above, but I keep getting an error ( https://gist.github.com/soccerob/8d8ba635c09f8e94e5a0d8db609ac4e6 ). I’ve edited the configuration.yaml file and specified zwave:
    usb_path: /dev/ttyACM0
    Any ideas? I have been able to configure several other components with HA, but can’t seem to get this one working. Here’s the command that I’m using to launch my image:
    sudo docker run –name home-assistant –restart=always –net=host –privileged -itd -v /volume1/docker/homeassistant:/config –device /dev/ttyACM0 -v homeassistant/home-assistant

    Is there some sort of driver or other software that needs to be running on my NAS to allow this stick to function properly?

    • Hey Robby,

      Interesting. I would first try and mount the volume with a -v. See if that does something for it?

      If not there is a Synology package you can download. I can remember the name of it, and think you might have to side load it. Unfortunately I’m away at the moment so can’t get the name of it. But that package adds some drivers which may allow you to use the USB.

      Cheers

  • Dear Phill,
    I’m using DSM 6.1
    I received also
    mkdir: cannot create directory ‘/volume1/Shared’: Permission denied
    I made dir manually, but I do not find configuration.yaml
    May be homassistand did not make when started.
    I need configuration.yaml because I would like to add Xiaomi gateway

    Help me please

    • Hey Kenand,

      I think volume1/Shared is protected by the system. You might be better to use something like volume1/Shared/homeassistant

  • Paul Thompson

    How can I identify what the Z-Wave USB stick is called? There are dozens of devices listed. I can’t see any new devices appearing under /dev when I plug the Aeotec Z-Stick in.
    The light on the Z-Stick is blinking and changing colour each time.
    I am running DSM v6.2.1

    • I would try a couple of these commands to see if it can help you track it down

      In my experience, it is usually something like /dev/ttyACM0 or /dev/ttyUSB0. Your mileage may vary though.

      • Paul Thompson

        If I plug the Z-Stick into the front USB3 slot it is showing up as dev/ttyACM0, but if I use either of the two USB2 slots on the rear I can’t see it.
        Any idea how to get it working on the rear USBs as I don’t really want it stuck in the front?

  • Elijha

    Firstly sorry for posting to such an old post – but this is linked to from the Home Assistent/Synology installer – so others will likely see this here also.

    Because I’m not command-line friendly and I like the ability to see the container running in the Synology Docker UI, see its processor/memory usage and restart it from there… is it possible to get the commands required to map the USB in the container via Docker UI?. The setup options are a bit limited but I noticed if I exported the container settings a json file is generated. I can then edit it and import it again. It seems to have more configuration options.

    Looking in that file I initial went to add the extra command-line arguments to the cmd field – but that didn’t work as I’m guessing these are commands to run after the container is launched not in the openign / launching of the container. BUT I also noticed two other field Devices and Volumes .. so I’m wondering if these can be used

    “cap_add” : null,
    “cap_drop” : null,
    “cmd” : “python -m homeassistant –config /config”,
    “cpu_priority” : 50,
    “devices” : “/dev/ttyACM0”, <— my z-wave USB
    "enable_publish_all_ports" : false,
    "enable_restart_policy" : true,
    "enabled" : false,

    and further down I could add a new section to the volume bindings – like this for the USB?

    “volume_bindings” : [
    {
    “host_volume_file” : “/homes/docker/homeassistant”,
    “mount_point” : “/config”,
    “type” : “rw”
    },
    {
    “host_volume_file” : “/dev/bus/usb”,
    “mount_point” : “/dev/bus/usb”,
    “type” : “rw”
    }
    ],

    Obviously if the above worked then I would not be asking but I’m wondering if I am just slightly off here or barking up the wrong tree.

    • To be honest I have never used the import/export feature of the Synology Docker UI. I found it so limiting, I just went straight to the command line.

      From what you’ve posted, I can’t see why Synology wouldn’t accept it. You’ve posted the same volumes and devices which my guide here mentions, and translates back to my docker run command. So my only suspicion then, is that the Synology Docker UI doesn’t support all of the features for a Docker container, which leaves you with either using the command line, or the UI (which will limit what you can set against the container)

      • Elijha

        HI Phil,
        Thanks for your quick response. I’m very new to HA / Docker. I’m probably trying to jump in with too high a setup initially – as I have a domain and HTTPS running and web apps hosted already on the NAS I’m trying to get this working on Docker on a sub domain using an SSL cert (because my NAS was set already to convert port 80 to 443, force HSTS and all those fun things that just won’t work when its not all set up right) I’ve ended up using reverse proxying 443 on the ha.subdomain to the to the docker container on port 8123 but I’m not sure how those are bridged or accessed really … and I’m not sure where I’m going wrong… I guess I need to go back to the inital setup again and do it in baby steps.

        I guess you might be able to answer one more question for me though:
        If I try the SSH command-line as you outlined above will I be able to ‘see’ it in the Synology NAS Docker manager (start/stop it)? I guess since to me commandline arguments are a bit of voodoo I’m worried I will end up starting multiple instances and not know they are sitting around using resources.

        • Yep! You will be able to see them in the Docker UI of Synology. Just opened mine up and can see them all.

          As long as you specify a –name in your docker run command, you shouldn’t really run into multiple instances, as the name must be unique.

          Another option might be to Install Portainer as a docker container. This is a more powerful Docker UI than Synology, but I haven’t used it myself.

        • grzeg8102

          Elijha, see my comment above Phil’s regarding the GUI export. I managed to make it work, so I don’t have to use the command line to redirect the USB device to Docker

      • grzeg8102

        Hi guys,
        I’ve just done the configuration export in my Synology NAS, edited the file, added my Z-Wave Aeotec device to the file under the ‘devices’ section, imported the configuration back in the Docker GUI in Synology and it worked! The Z-Wave component was detected by HA in the Docker and initialized successfully.
        No need to use the command line. We can still use the convenient Docker GUI in Synology this way!

        You need to add the following piece of text in you config file exported from the GUI:
        "devices" : [
        {
        "CgroupPermissions": "rwm",
        "PathInContainer": "/zwaveusbstick",
        "PathOnHost": "/dev/ttyACM0"
        }
        ],

  • Paul Thompson

    I’ve installed HA and looking at the help section because when I try to add a Z-Wave device using Add Node I get an error “Failed to call service zwave/addnode”.
    The HA help says the Z-Stick should have group of dialout and rw permission.
    crw——- 1 root root 166, 0 Jan 5 09:55 /dev/ttyACM0

    I have a putty session to the NAS to run the ls -l that gives the result above.
    The help says run commands:
    sudo chgrp dialout /dev/ttyACM0
    sudo chmod g+rw /dev/ttyACM0

    and to check what groups the account running home assistant belong to.
    However I don’t have a dialout group.

    What determines which user account is running HomeAssistant? I’ve used the commands shown in above instructions to install HA in docker with Z-Wave.

    Am I looking in the wrong place? Should these groups be visible when logged in to the NAS or are they set up within the Docker container somehow?

    Thanks
    Paul

    • Very strange. I’ve never had to worry about “dialout” groups on Synology. Not sure it is applicable.

      When you perform your docker run command, the user you’re SSH’d in as will determine who the container runs as. Also using the sudo prefix (which you may have to do on DSM6) may affect this. So if you’re logged in as admin, the container will run as the admin user.

      Are you specifying –privileged in your docker run? This will ensure the container gets as many permissions as possible to the host machine, which may include the rw permissions it needs to the Z-wave USB.

  • John Sills

    Can I use Lovelace as a GUI for home assistant running on my Synology. I have HA installed, just want Lovelace gui

    • Of course!

      You’ll need to access the Lovelace UI from the info panel (just as you would any other platform), until Lovelace becomes default in a future version

  • Mike

    Did you have any issue with high memory usage on the Synology NAS docker container? If so, how did you address it?

    • Sort of. Eventually I found that Home Assistant was pretty slow to run on the NAS as my needs increased. I put it down to running too much on the NAS (Plex, HASS, MQTT, Grafana, Influx etc).

      My solution was to move off the NAS to an old nettop PC I had around. I store all of my things like InfluxDB, MySQL etc on the NAS, but all the automation work etc is handled on the nettop, which just runs Home Assistant now.

      • Mike

        I don’t have any issues with speed as it’s WAY faster than my RPi3 was. The issue I seem to have is that it gradually consumes quite a bit of memory. Seems to hover around 2.5GB. I’ve seen references to it being a logging issue, but I’ve followed the recommendations for that (I think) and it hasn’t gone away. You seem to be quite knowledgeable about this so I’m hoping you can help me figure it out.

        • OK that’s interesting then.

          I just took a look at my instance of HASS running on my Synology, and memory is at 0% CPU between 1% and 3%. I must stress though this instance doesn’t do much at all.

          Do you have your config posted anywhere by chance I can browse over?

          If not, I would take a look at your home-assistant.log, and see if that is being rewritten to a lot. Would also suggest moving to MySQL/MariaDB instead of SQL lite (if you haven’t already)

          • Mike

            I could get a copy of my config file to you if you’d like to see it. My home assistant log is being written out to a volume but I know there’s another log somewhere as I had access to it briefly through the docker interface. I just looked and it’s not there now. It had everything being written to it from the look of it. What is the advantage of MySQL/Maria over the built in database?

          • If you’re still using the built in SQL lite database, I found that to be very very slow. It is a file database which has to be loaded into memory. After a week or so of usage, my SQL database was easily over 400mb in size, which meant restarting and running hass was slow, because it had to maintain this huge database file.

            MySQL is a database server (I run it in its own container), so there’s no overheads for Home Assistant to worry about. It just pushes the data to the MySQL server, and it takes care of it.

            This might be an explanation on your high memory use.

          • Mike

            I’ll look into converting to the MySQL database in it’s own container. I’m really liking this whole container thing. Is there any tricks I need to be aware of when rebooting? I’m going to assume that the MySQL instance needs to be up and running before HA starts or things aren’t going to go well. Does it start fast enough to be ready when HA needs it? Any particular docker image you prefer?

          • I have my MySQL container always up, it never gets rebooted. No need. So when Home Assistant reboots, the container is already up and ready to go.

            Now if your MySQL container is down for whatever reason, Home Assistant will still boot, but it will complain about the recorder components being misconfigured because MySQL is down. You’ll need to reboot Home Assistant once your MySQL is back up to clear it.

            I don’t really have a preference, but I’ve been using sameersbn/mysql without problems. Infact, according to my docker ps, I have had the same container for over 2 years on my NAS.

          • Mike

            I followed this EXACTLY:

            https://community.home-assistant.io/t/setting-up-mysql-on-a-synology-nas-docker-container/16253

            The database appears to be there but I’m getting this error:

            2019-02-14 23:52:16 ERROR (Recorder) [homeassistant.components.recorder] Error during connection setup: (MySQLdb._exceptions.OperationalError) (1045, “Access denied for user ‘hass’@’192.168.0.3’ (using password: YES)”) (Background on this error at: http://sqlalche.me/e/e3q8) (retrying in 3 seconds)

            I’m looking into the error, but it’s like reading Mandarin Chinese…. 🙂

          • Well that’s interesting. You’re getting an access denied error, so I am assuming HASS can connect to the box OK. Have you put your password in correctly? No hidden whitespace at the start/end of it?

          • Mike

            Not that I’m aware of. Copy and pasted the commands exactly.

          • Sorry I’m running out of ideas. When you first did your docker run of your Home Assistant container, did you also specify –net=host so that container was also running on the host network?

          • Mike

            Yes. I’ll send you as many details as I can when I get back to it. Might be Saturday or Sunday though.

  • Dear Phil,
    I updated homeassistant with your instructions.
    I can start and stop Home assistant from terminal.,
    docker start home-assistant
    But how can I start Home asistant from DSM menu? Original version also do not start (It’s my oponion I renamed to home assistant-old)

  • Hey Phil. Thanks for the link to this info. I’m stuck, however, because I don’t run a docker command to start Hass.io. I installed HASS.io on my Ubuntu box using a script by Frenck. https://gist.github.com/frenck/32b4f74919ca6b95b30c66f85976ec58. At the end of the script, the start command is a systemctl command that fires up something called hassio-supervisor.service. So, if the issue is making the USB port accessible to the Docker container via a command line adjustment, I don’t know where that would go. I find it strange that the hardware report in the System tab of HASS.io shows the Aeotec Stick on /dev/ttyACM0 just like it was on my RPi3 (which worked fine), but won’t initialize the Zwave interface in HASS.io. Ideas?

    • Hey Jon!

      That is rather interesting. What really stumps me is that the hardware report is showing that path.

      Where are you trying to use the USB stick? On the Home Assistant container, or another addon?

      I’m no real expert with HASS IO unfortunately, haven’t used it too much. However the fact that the path is being reported tells me that you might actually be able to just plug that into your YAML and use it. But that seems too easy…

      • I’m a moron. I realized that I had created a config folder for zwave: but forgot to add the zwave: include into the configuration.yaml file. Then I realized that my indentation was off in the yaml. It’s all working without fail now. Although now I’m having trouble with ingress producing bad gateway errors…grrrr. ;).

        • It is always something as simple as that! 😉

          • Truth. Thanks for the quick responses though. :)… in what part of the world are you?

          • Melbourne Australia 🙂

  • Hendrik Schokker

    I get the error ‘Start container home-assistant failed: {“message”:”Bind mount failed: ‘/volume1/Shared/docker/homeassistant/config’ does not exists”}.’
    I do have a volume called volume1 but I don’t see any folders such as Shared, docker or homeassistant. All I see is docker directly under the server name and homes. (homes contains user folders)

    • Hey Hendrik,

      If you don’t see any folders like Shared etc, then you might want to create a new Shared folder from the Synology UI.

      Alternatively you could put the config in a user folder. So replace /volume1/Shared/docker with /homes/[user]/homeassistant/config

      You may need to run mkdir -p /homes/[user]/homeassistant/config first. Be sure to replace [user] with the username that exists in the users folder already.

      Cheers

      • Hendrik Schokker

        Thanks! I was able to create the folder volume1dockerhomeassistantconfig and use that. 🙂

        I was able to migrate the raspberry pi hass.io configuration to the Synology installation and most things worked right away. (USB device is acm0, still have to check what a reboot will do on my setup)

        Next challenge is getting mosquitto to run on the Synology.

        • Nice one!

          Yep MQTT on the NAS I highly recommend. I am still using the same container I setup for these instructions: https://www.youtube.com/watch?v=QtqgvoheXGQ

          • Hendrik Schokker

            I tried something similar with the eclipse mosquitto. A friend of mine has it working but I keep getting

            mosquitto_1 | WARNING: no logs are available with the ‘db’ log driver
            docker_mosquitto_1 exited with code 3

            When I try to run with using compose with the following:
            mosquitto:
            image: eclipse-mosquitto:latest
            restart: always
            ports:
            – “1883:1883”
            – “9001:9001”
            volumes:
            – /volume1/docker/mosquitto/config:/mosquitto/config
            – /volume1/docker/mosquitto/data:/mosquitto/data
            – /volume1/docker/mosquitto/log:/mosquitto/log

            I even tried to create all the folders (mosquitto and subfolers config data and log) myself and giving everything CHMOD -R 777. Nothing helps.

          • That’s quite strange. I’m not too familiar with that image, sounds like it is trying to write to a database somewhere, but expects the database to exist

          • Hendrik Schokker

            When I manually create the mosquitto.conf file in the config folder then it works. It is all up and running now. (And now on to the next docker image 😛 still a long way to go)

  • Def have to spend more than a week down here! Especially considering how long it takes to get here!

    Ooooh! Nice. Your site is coming along nicely

  • Joseph McCurdy

    Hi Phil,

    Thank you for the explanation, however I’m now stuck with one error:

    sudo docker run –name home-assistant –restart=always –net=host –privileged -itd -v /volume1/docker/hass/config:/config –device /dev/ttyACM0 homeassistant/home-assistant
    9587b90d423ce13daf5a25f7beb2154cb8b71b7d5d33ddfb59043fec2f27ba49
    docker: Error response from daemon: all SubConns are in TransientFailure, latest connection error: connection error: desc = “transport: Error while dialing dial unix /var/run/docker/containerd/containerd.sock: connect: connection refused”: unavailable.

    Would you be able to advise how to solve this please?

    Thank you

    • Hey Joseph,

      That is a strange one. Unfortunately I’ve never come across that one and not sure how to help :/

  • Mike

    Phil, my DSM went wonky and had to re-install. Now I can’t see all of my USB devices. The Z-Stick is still there as it shows up ttyACM0 but I have another that the original path was /dev/ttyUSB2 and I can’t find it anywhere. It’s probably a permissions thing but I lost all of my notes as well. They were in the home folder. Mental not, NOTHING important goes there…

  • Андрей Гладких

    Hello,
    Phil, sorry for my question, but I am begginer in this. And asking your help.
    My configuration is: Hass.IO on Synology Docker (PC with firmware). Synology version is 6.1.7.
    I added USB bluetooth for BLE xiaomi sensors connection. I see FlowerCare in HA without addidtional activities. But as I understand it is necessary to use your recommendations for Xiaomi BLE sensors (Clear Temperature …).
    1. Step: see USB using PUTTY and cpmmand: ls /dev/tty*
    https://uploads.disquscdn.com/images/3918e856bf2553e9ba29e63900902d12253351a33f49f649ebcb24afef7199aa.png
    It is huge qty, but I have only Loading USB and Bluetooth USB
    I can’t understand what is correct …
    2. Step: sudo docker run –name home-assistant –restart=always –net=host –privileged -itd -v /volume1/Shared/docker/homeassistant/config:/config –device /dev/ttyUSB0 -v /dev/bus/usb:/dev/bus/usb homeassistant/home-assistant
    Please, could you write correct command for my situation.
    https://uploads.disquscdn.com/images/82b3284778356b22f2d6f688d21d287ff902c33a2fd770a443a6b516bca94bf6.png
    The first folder is in Volume 1. Docker is in Volume 1 too.
    As I understand it is all required to use BLE in HASS.IO
    Thank you
    BR,
    Andrey

  • Sam Soffa

    Do you have instructions for DSM 7 and USB?

Start typing and press Enter to search