Setting up a local Mosquitto server using Docker for MQTT Communication

Mosquitto (or MQTT) is an open source message broker you can use to enable communication between devices, enabling your smart home to communicate with a wider range of devices.

Having devices in your home communicate with each other enables you to create a smarter home. The more information you can feed your smart home controller or software, like Home Assistant the better. MQTT offers a light weight and fast way to send information between devices.


How It Works

You first need to setup a MQTT Server, or “broker”. Each device will publish or subscribe to a topic on the broker. The topics can be anything, such as the state of a door lock (locked or unlocked), the current temperature etc.

When a new message is published, the MQTT broker will send that message to devices that have subscribed to that topic instantly. This is very similar to the way PubNub works for commercial applications.


What You Can Do With MQTT

There’s a whole range of applications you can use MQTT for. Infact, Home Assistant comes with support for many uses for MQTT, including:

ALARM PANELS

Use MQTT to update the state of an alarm panels armed state, or get notified when your alarm panel is armed/disarmed. This allows you to do some automations such as sound an alarm if the alarm panel is armed, and motion is detected. Or, turn everything off when the alarm panel is armed.

PLANT SENSORS

Use a sensor to measure things like temperature, light levels, soil moisture and have the current values sent to your home automation software via MQTT. I personally prefer to use these Bluetooth flower/plant sensors, which also integrate nicely into Home Assistant.

LIGHTS

Turn lights on and off by publishing an on/off command to a topic in MQTT.

PRESENCE DETECTION

Use the OwnTracks app for iOS or Android to tell your Home Automation system where in the world you are. You can then use zones to let your house know when your phone is at home, at school or work.


Benefits of a Local MQTT Broker

There may be situations where you need to publish updates to your MQTT Broker from outside your local network. If you use the OwnTracks app, you’ll need to have constant access to your MQTT broker to publish your location.

If you don’t have a static IP address, or feel uneasy about poking a hole through your Firewall and exposing an MQTT Broker, you might be better off using a cloud based MQTT Broker like CloudMQTT.

Of course, that’s only if you need to publish or receive messages outside of your home network. Using a hosted MQTT Broker outside of your network has some concerns.

  • Internet Connection Required – If your internet connection drops out, you’ll lose your connection to the MQTT Broker. This means your lights, alarm panels and anything else you have talking with MQTT will stop talking to each other. You don’t want to come home during a storm to internet lines down, and not able to disarm your alarm or turn on the lights because the internet is out.
  • Latency – It can take a few seconds longer for your MQTT messages to be received when using a hosted MQTT Broker. Imaging pressing a switch to turn the lights on, but having to wait two seconds before the lights turned on. Possibly longer if someone is streaming Netflix and slowing down your internet connection.

For those reasons, I think it’s always better to run a local MQTT Broker. If the internet drops out, as long as my internal home network is up, everything is still in business.


The Latest In Your Inbox

Enter your email address below to receive my latest blog posts and videos about Home Automation in your Inbox


Enter Docker

I’m a huge fan of Docker, and Dockerizing all my things. I’ve got Home Assistant setup on my Synology Diskstation NAS thanks to Docker, as well as a whole bunch of other micro services to compliment my smart home.

Using Docker, we don’t have to worry about installing software package x to get y working. Docker installs everything it needs for the service (in this case MQTT) inside its container.

The great thing about Docker is you can run it on a variety of platforms, such as a Raspberry Pi, a windows PC (sort of) and of course like me, a linux based NAS such as a Synology Diskstation.


Installing MQTT with Docker Commands

Depending on your machine you may have an interface for you to add Docker containers. Synology has one, and the official Docker for Windows has one too. I prefer to setup Docker containers using the command line. The commands below should work on any system where you’ve already installed Docker.

For Synology users, there’s also one big advantage to using the command line. You can add some options to your Docker containers which the Synology Docker Package doesn’t allow, including automatic restarting of your MQTT broker if it goes down. Which can come in quite handy.

Setup your Synology NAS for Docker

Before you can run any Docker commands on your Synology NAS, you’ll need to have SSH configured, and root access (if you’re on DSM5). I cover this in my Home Assistant setup post, so be sure to check that out first if you haven’t already.

Read More

Let’s go ahead and paste this command into our terminal. I’ll break each option down.

If you’re running using a Synology NAS on DSM6, be sure to prefix that command with sudo.

docker run tells Docker to run a container with the parameters we’re parsing.

--name mqtt The name flag will allow us to easily identify which container is running MQTT. This is useful if we need to do some commands against the container (like starting, stopping etc) later.

--restart=always This is a powerful and handy flag to set. This will tell Docker to keep trying to re-start the MQTT Broker if it crashes, or on boot of the system. (This is one of the flags you can’t set when using the Synology Docker DSM Interface).

--net=host Another important and powerful flag. This gives your MQTT Broker full network access. This allows you to use 127.0.0.1 as the IP address of your MQTT Broker in Home Assistant, if you followed my setup guide. (This is one of the flags you can’t set when using the Synology Docker DSM Interface).

-itd This is actually three commands in the one. The important one is d. This tells Docker to run in detached mode. Once Docker runs the container, our SSH session is returned to us. If we don’t specify this, we’ll see the output from the MQTT Broker in our SSH console.

-v /volume1/docker/mqtt/config:/mqtt/config:ro Here we’re creating some mount volumes with the various -v flags. This will allow configuration to persist across reboots, as well as data. So, if your MQTT Broker goes down, any persistent messages you may have sent over the Broker should come back up. You can place it in any folder you like. Whatever you choose to use, the folder must exist before you will be able to start the MQTT Broker. If you want to use the same folder as I did above, you can create it by running mkdir -p /volume1/docker/mqtt/config

toke/mosquitto Finally this tells Docker which container to lookup on DockerHub. I’ve been using this image from Toke without issue for many months now.


Testing MQTT

So we’ve got our Docker container up and running, but how do we know its working? There’s a handy free program called MQTT.fx which is available for Mac, Windows and Linux. Or if you’re using Chrome there’s a free Chrome Extension called MQTT Lense.
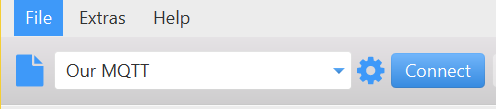
I’m going to use MQTT.fx, let’s try to connect to our MQTT server. My NAS’s IP address is 192.168.1.3. MQTT runs on the port 1883 by default.

In MQTT.fx, press the settings icon to setup a new connection. We’ll use the server address details above for this. Once we’ve setup our new connection, select it from the list and press the blue connect button.
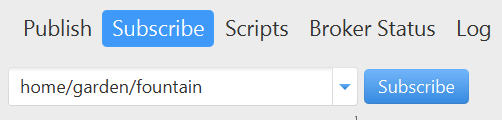
Once you’ve connected to your MQTT server, we should first “subscribe” to a topic. Let’s move to the subscribe tab, and enter a topic to subscribe to. For now, let’s choose the topic home/garden/fountain which is the default for MQTT fx.
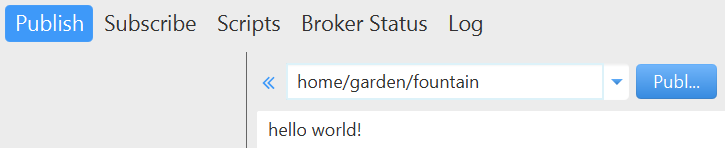
Now that we’ve subscribed to our topic, let’s move back to the Publish tab, and now we’ll send a message on the home/garden/fountain topic. In the message body, let’s type “hello world!” and then press the blue Publish button.

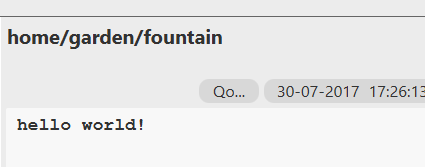
If we switch back to the Subscribe tab, we should now see our home/garden/fountain topic has a message with hello world!

Wrapping Up

We’ve now got an MQTT server running on our Synology NAS. We can now use it to communicate securely and quickly through our local network.

You’ll most likely want to use this in combination with OwnTracks to have your phones GPS location sent to your Home Automation software, like Home Assistant. Using your own MQTT server, your privacy is more secured than using a public MQTT server. Before you can send messages to your MQTT server outside your local network though, you’ll need to expose your MQTT server port (1883 by default) to the world through your router, and use your IP address or a service like duckdns.org if your IP address changes.

In the future I’ll be doing some writeups about how I use my local MQTT server for various things around my smart home.

Recommended Posts
  • Bree Lindsay-Stewart

    Phil,
    I think you will find the docker image has change it’s name to toke/mosquitto 🙂

    • Ugh yes you’re right! I had the right one in the video, but forgot to update the post with the right one!

      Thanks!

      • Bree Lindsay-Stewart

        Thanks for the great insights Phil, just found your site the other day and considering I’m using the same products as yourself (Home Assistant/Synology NAS) it’s been a great help 🙂

  • Tijmen Schoemaker

    Hey Phil, excelent tutorial again! Maybe add some info on how to use this with Home Assistant?

  • Nicklaus Craig

    Phil, thanks for the great video! I followed your video to the letter (I am running DSM 6 so i added sudo to the beginning of the commands). I can’t figure out how to create a password file and username for the mqtt login?

    • So this one is a bit tricky. We’ll need to setup a password file to work with MQTT.

      The easiest option is to do the following.

      1. Access bash by running the following command from the Synology SSH

      2. Once you have bash access to the container, we’ll be running a command to generate the password file.

      You’ll be prompted to enter your password twice.

      3. The password file should now exist as passwd_file. You should be able to see this in the Synology filemanager now as well. We now need to tell MQTT to use this password file for authentication. Open /volume1/docker/mqtt/config/mosquitto.conf and add the following to the file

      Then exit out of the bash, and restart the MQTT container. That should require you to enter a username and password to use the MQTT broker now.

      Cheers

      • Nicklaus Craig

        Worked like a charm!! Thank you.

      • Pete

        Hi Phil,

        When I try and add a username and password, it asks me for the password twice then says this:
        Error: Unable to open file passwd_file for writing. Read-only file system.

        How to I fix that? I did chmod 0777 on all three folder locations and the MQTT broker is running.

        • Hey Pete,

          I think it might be a user issue. The container is trying to write to a dir which is owned by a different user. Can you try running the container with the –privileged flag to give it higher access to write to the filesystem?

          • Juan Perez

            Phil, can you please provide the command for running with privileged flag?
            I have tried numerous combinations with no luck

          • Hey Juan, based on my example it should just be something like this

            Cheers

          • Juan Perez

            Phil, thank you very much for your help.

  • Jokerigno

    Hi Phil!

    Thank you for the tutorial!

    There’s a way to use mosquitto with HTTPS?

    Right now I’ve installed HA in my DSM and I’m using synology for generation ad updation certifcates. It works like a charme for HA but I can’t figure it out how to set it up for mosquitto.

    Thank you in advance!

    • Hey!

      Yes, MQTT has an option for SSL/HTTPS. You should be able to point your certificates at it.

      You’ll need to edit the mosquitto.conf file to enable SSL. If you’re using docker, you’ll most likely want to mount the volume where your SSL certs are generated into. Once you’ve got that, just update the mosquitto.conf with the location of your certs and it should work.

      Unfortunately I haven’t got this working myself. I keep everything firewalled off, so only internal things can access my MQTT, which seems overkill to use SSL just on an internal network. However if you’re using your own MQTT broker for things like OwnTracks when you’re out of the house, SSL would probably be a good idea.

  • André van Stijn

    Hey Phil,

    Another nice tut from your site, I just tried to setup mosquitto (as root) your way but it failed to start. I made the directory’s myself and runned your command with a differend path. However I receive the following error’s when I try to run it. Hope you can help me, I think it’s a permission issue?

    https://uploads.disquscdn.com/images/3e03324106247214dfc19b55ebd37fa301ac03e88284fa19695a4b553540dac1.png
    https://uploads.disquscdn.com/images/60b44d6937a501b1b15b02ded79140487139205e9dd126cd0d3d5ea52feac21b.png

    The conf files are not in this directory.

    • Thanks André!

      Yep, think this is a permission issue with ownership, Think you need to add –privileged to the docker run command so that the container has permission to write to the hosts files.

      • André van Stijn

        Sorry for being a noob but it is still not running:

        docker run –name mqtt –restart=always –net=host –privileged -tid -v /volume1/shared/docker/mqtt/config:/mqtt/config:ro -v /volume1/shared/docker/mqtt/log:/mqtt/log -v /volume1/shared/docker/mqtt/data/:/mqtt/data/ toke/mosquitto

        https://uploads.disquscdn.com/images/b72c69a8e48dc0c718bf265fcc3a8a6c0dc4ef918c6a75de0e22b2234af7ce75.png

        I tried the –privileged on other places as well but can’t get it running

        • André van Stijn
          • Also, if you’re on DSM6, another user Ced has found they needed to use a different flag instead of -v (which wouldn’t work on DSM6 for some reason)

            So you could instead try this instead of your -v flag

        • This seems to be getting closer though. Looks like it is a different error message now.

          Can you try running

          It seems to be complaining that directory doesn’t exist for some reason.

          • André van Stijn

            I get an successfull install right now but it is not restarting, the log file is there “mosquitto.log” but I get the message “1519800972: Error: Unable to open log file /mqtt/log/mosquitto.log for writing.” Who needs to be the owner, now it is root, I also tried http but that isn’t working as well

          • You might need to chmod the directory on the NAS to allow others to write to it

          • André van Stijn

            Made the 3 directory’s chmod 777 and now it’s running, I cannot reach the webinterface because of tis error though “Socket error on client , disconnecting.”

          • Wonder if there’s a port that can’t be opened. Are you using –net=host ?

          • André van Stijn

            Yes I used that, the log gives me this reply now “Socket error on client , disconnecting”

            I cannot reach it locally 192.168.1.15:1883 but it is running in a docker.

          • Strange.

            I am indeed using the host flag. Incase it helps, here is my Docker run command I am using on DSM5

            I am specifying the –net=host and also -p flags, but the -p flags will be ignored.

            I have Home Assitant running on the NAS, and it connects with the following YAML

  • Gold3n Man

    Hi Phil, great work up on this.

    I am having an issue where it will start and run for a few seconds then restart. I have no log file so dont know why it is happening. I am running DSM 6.2 and used your command:

    I also tried using:

    but that gave me an error:

    . Not sure where to go from here. Any help would be great. Thanks.

    edit: I found these errors actually

    My config file looks like yours:

    • Very interesting!

      I have a feeling it has something to do with the config file.

      1. I noticed in your copy paste, the YAML doesn’t look like valid YAML. For examle

      should actually be

      . I would run your file through something like http://yamllint.com/ to confirm it is valid
      2. If it is valid, it could have something to do with line endings. You should ensure the YAML file is saved with unix line endings (Windows line endings might throw the system off). Most code editors like Visual Studio Code and Notepad++ should allow you to set the line endings.

      Hope that helps!

      • Gold3n Man

        I did just copy paste in to notepad, ill try just building it in the synology itself. Thanks.

  • Marnix

    Hello Phil,

    First, thanks for the great tutorial.
    I managed to run mqtt via the docker command in the intructions but I’m somehow unable to connect to the broke via MQTT.fx.
    The logs of MQTT.fx says the following:

    I’ve checked the Firewall on my Synology and ports 9001 + 1883 are both open for all Source IP’s.

    Any clue?

    • Interesting. Couple of things to try

      1. Set the

      flag during the docker run statement. You might need to use it when setting some external ports.

      2. Set the

      flag, which will give the container full host network access and expose all of its ports.

      If that doesn’t work, then I would run the container in attached mode, and see if there are any errors that come out in the console. To do this, remove the

      part of the run command.

      Hope that helps!

  • Krystian Wencel

    Hello Phil, thanks for great job. I’m running toke/mosquitto on openmediavault-NAS.
    docker run -d –restart=always -p 1883:1883 -p 9001:9001 -v /sharedfolders/appdata/mqtt/config:/mqtt/config:ro -v /sharedfolders/appdata/mqtt/log:/mqtt/log -v /sharedfolders/appdata/mqtt/data/:/mqtt/data/ –name mqtt toke/mosquitto
    I got the output:
    Error: Unable to open include_dir ‘/mqtt/config/conf.d’.
    Error found at /mqtt/config/mosquitto.conf:17 (include dir can’t be read)
    Error: Unable to open configuration file.
    Write access to group users is permitted – regards Krys

    • Hey Krystian,

      You might have to do the following command first, then try your docker run

      You may also have to chmod that directory to ensure everyone (0777) can read and write to it

  • Mike

    I’m using the following command to start a docker container and I need the logs and persistent data. For some reason, it isn’t holding the data and I’m not getting any logs. I have the folders and as best I can tell, it’s pulling the password data as it should from the password file.

    sudo docker run –name mosquitto –restart=always –net=host -itd -p 1883:1883 -p 9001:9001 -v mosquitto.conf:/volume1/docker/mosquitto/config/mosquitto.conf -v /volume1/docker/mosquitto/data/:/mosquitto/data/ -v /volume1/docker/mosquitto/log/:/mosquitto/log/ eclipse-mosquitto

    Here’s my mosquitto.conf file as well.

    # Place your local configuration in /mqtt/config/conf.d/

    pid_file /var/run/mosquitto.pid

    persistence true
    persistence_location /mosquitto/data/

    user mosquitto

    # Port to use for the default listener.
    port 1883

    password_file /mosquitto/config/passwd_file
    allow_anonymous false

    log_dest file /mosquitto/log/mosquitto.log
    log_dest stdout

    #include_dir /mqtt/config/conf.d

    I’m hoping you can spot my issue. I’m adding the the restart flag and stuff but I’m more concerned with the issue at hand at the moment.

    Thanks!

    • Looks like you’re using the -v flag incorrectly. I would try the following command

      I would also check the eclipse-mosquitto container for the correct locations.

      Hope that points you in the right direction

      • Mike

        I wound up switching to the toke/mosquitto image but I’m still having an issue getting it pointed it the config file. I have the log and persistent data though so it’s not a pressing issue. I’ll look at this when I get a moment. Thank you!!!

  • ripvega

    Great tutorial, thank you. I’m attempting to move my Home Assistant setup from RPi to my newly purchased Synology. I have little or no experience with docker and using terminal on my Mac yet have managed to get mosquitto running but can’t set the username and password that my devices will use. Does it need a password file? I don’t see any files to edit in the config folder? If you have the time to help, please keep it simple. I’ll learn but at a slow pace.

  • AbDhops

    Hi Phil,
    I hope you can help me. I am running eclipse-mosquitto in my synology docker. It communicates with devices, home assistant and every thing is fine, except I don’t see the logs and persistent data. I have complete mosquito conf file under /volume1/docker/mosquitto. Then after there are subfolders for config, data and log.
    My docker command is like
    docker run --name mosquitto --restart=always --net=host -itd -v mosquitto.conf:/volume1/docker/mosquitto/config/mosquitto.conf -v /volume1/docker/mosquitto/data/:/mosquitto/data/ -v /volume1/docker/mosquitto/log/:/mosquitto/log/ eclipse-mosquitto

    Any guess what is going wrong…

    • I am wondering if it is a permissions issue. The docker container is running as a different user than is on your NAS, and hence might not have permissions to write logs/data to the NAS.

      On your NAS, I would chmod 0777 everything in and under

      • AbDhops

        Interesting… I changed the permissions and still its the same.
        Now, inside docker I see mosquitto directory like below.
        drwxrwxrwx 1 mosquitt mosquitt 26 Mar 7 22:54 mosquitto
        inside the directory, everzthing is like below…
        drwxr-xr-x 1 mosquitt mosquitt 28 Mar 7 22:54 config
        drwxrwxrwx 1 1026 users 0 Mar 20 21:23 data
        drwxrwxrwx 1 1026 users 0 Mar 20 21:23 log

        Any more guess… ???

        • Hmm no sorry, I’m not familiar with that image. Might want to double check that you’re mapping the right paths on the guest/container, and have the right settings configured 🙁

          • AbDhops

            No worries Phil. You tried. Do you know any group or MQTT community where I can ask…
            Thanks again…

          • Hmm my goto would be /r/docker on Reddit, thats all I would know off the top of my head

  • Chief

    Just a quick note, the -t flag with docker run isn’t for tagging, it’s for allocating a psuedo-tty, which gets stdin and stdout signals from the container. The container is automatically saved for later use since you aren’t specifying a --rm.

    Great tutorial!

    • Thanks Chief. You’re absolutely right of course. Ooops. I’ve amended that!

  • Trefex

    Hi. Actually all the options you mentioned that need to use CLI do exist in DSM.

    • Doomed Day

      gotta remember he wrote this in 2017.

  • Viking

    Nice write up. Thanks. But when a new version of Mosquitto is released, what is the easiest way to update an already stable running version (without having to do the whole installation from scratch all over)?

Start typing and press Enter to search